Procedural images in OSL
using Blender or 3DSMAX, free choice.
In lab 1, we were working strictly in 2D. Today, we will start putting textures on 3D objects, and even modify 3D objects!
This lab stands out as the oddball in the crowd, since I am otherwise focused on OpenGL. But we don’t fear the different! This will show you a very different environment for shader programming, where the shaders act as plugins in a more complex and customizable chain of shader stages. This is possible since it is less tied to the hardware that the OpenGL pipeline is.
In this lab, we will see how shaders work in an off-line renderer. Here, we will put our shaders in a part of a more complex chain of stages. The advantage is that the chain is configurable, so we can combine things freely. With C, we had no chain at all, and with GLSL, the shaders are in specific places in the graphics pipeline. Here, we the entire pipeline can be rearranged.
Aim and platform
The aim for this lab session is to get you started with OSL shader programming, custom shaders that you use with Autodesk 3dsMax or Blender. I demonstrate how to use OSL in Blender on lecture 5.
There are very few examples and tutorials available online, but most of the material written for Renderman SL (RSL) is at least generally applicable, and OSL is very similar to RSL both in terms of purpose and syntax. A lot of RSL code is actually valid OSL code, and at least some RSL shaders may work as OSL shaders with only minor edits.
Using Blender
Using OSL in Blender is not hard but requires a few steps:
Launch Blender. In Linux and Mac you should do that from the Terminal.
File -> New -> General
Click upper left, look in the right part of the pop-up window. Select “Properties” (icon with two mini sliders)
A bunch of icons appear on the left. Click the camera icon (2nd from top on left side)
Render engine: Cycles
Tick “Open shading language"
Click tab “Scripting” (on top)
Select Templates->Open Shading Language->Basic shader (Note that there are some useful templates here)
Name the shader as you please. How about “test.osl”? I suggest a file name that matches the one in the shader.
Click tab “Shading”
Add script -> script. Select your script. A node appears.
Click the double arrows to compile.
Create new nodes for in/out:
Add->input -> RGB
Add->shader->Diffuse BSDF
Connect the nodes to a chain: RGB -your shader - Diffuse BSFD - Material out
And now… nothing happens! Why?
Because the rendering is set to a trivial preview. Hover in the view with the cube and hit “Z”. You get a popup “spread out” menu. Select “Rendered”.
Now it should change, and the cube should get a color based on the RGB node, changes by your shader! Now make some script changes (go to “scripting”, change, go back to “shading” and recompile).
Did you get errors? In Linux and Mac the error messages go to the Terminal, not the built-in console.
Did it work? Then you are ready for some creative hacking!
Using 3DSMAX
For 3DSMAX, which I have no idea about myself, Stefan has made a tutorial linked below. More information can be found in the help system for 3dsMax, and in online resources like the OSL specification (linked from the main course page).
Your own computer?
To perform this exercise on your own computer, you either use 3DSMAX under Microsoft Windows, or Blender with Windows, Mac or Linux. If you want to use 3DSMAX, Autodesk has an offer for students at LiU to download a copy of their software for free. It's not restricted in any way, but you are not allowed to use it for commercial purposes. To install 3dsMax on your own computer, visit www.autodesk.com and find the link at the bottom of the page named "Students and educators". There you will find instructions on how to register an account with them to download and install 3dsMax. Version 2020 should work just as well as version 2019 which is installed in the course lab, but you will not be able to share files between the two versions freely.
If, on the other hand, you use Blender, just download and install! No restrictions!
Lab files:
Same archive as lab 1. See lab 1. Lab 2 is not a “lab shell” but some optional files that you may use.
Tasks:
All instructions are made with Blender. I expect 3DSMAX to work similarily but I can not guarantee it.
1. Set up. Follow the instructions for enabling OSL and creating a shader. You need a model to render your textures on. Either you start with the cube or you load another right now (step 2).
Similar to lab 1, let us start with a simple pattern, written in OSL.
The shader should be linked in as a script node. Use suitable built-in data to base your pattern on.
What pattern did you make? What data did you base it on?
2. The cube is a bit dull. Load another geometry. There are some built-in ones that you find in the “Modeling” tab, select “Add”. You can also import one of the models included with the lab. You may want to move (G), rotate (R) or scale (S) the model. All this is done in the Modeling view. However, modeling is not out goal today. Back to “shading” and “scripting”!
Note that the new model will have its own node system.
What model did you select, and why?
3. Using a noise function in OSL, make a noise based pattern.
Did you need to scale the noise? How much? What data did you base it on?
4. Make in OSL a pattern that combines a simple pattern (e.g. from step 1) with noise. You do not just add them together, make them interact to create something more interesting.
Describe how you combined the data.
5. Now create a shader that can modify geometry. You do this my sending data to the “displacement” input in the "Material output” node.
Important: You may need to change a setting, which I found like this:
The sequence is: Properties - Material properties - Settings - Surface, and then select “Displacement and bump” from the pop-up menu. If it isn’t there, have you activated Cycles?
Can’t find it? This might help:
Click in the upper-left of any subwindow to get this:
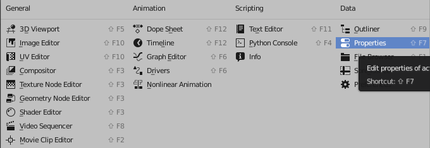
There you click this
Followed by this:

and you get here:
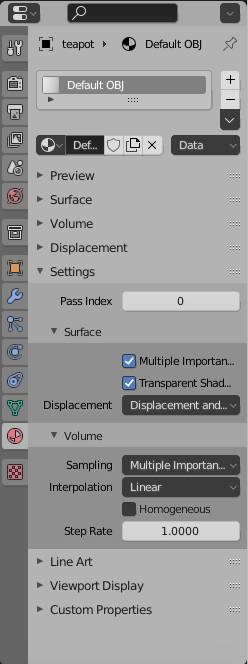
…where you open “Settings”, then “Surface” and there you have the pop-up.
I hope it is complete this time. There may be differences between different versions of Blender.
Was your model suitable for this operation? How can you vary the displacement?
6. Make some kind of more step. Explore the possibilities of the language and the built-in shaders. We will be very tolerant about the level on this step. Make something amazing if you have time, something simpler if you don’t.
Impress us! :)